This post shows how to convert cassette tapes to CDs. It can be done for free if you already have a cassette player and the correct cable and you download some free open source software. If you don’t have a cassette player, I’ll show you an inexpensive USB player that I use.
I have hundreds of cassette tapes that I accumulated from the 1970s until the late 1990s. They are mostly music tapes, although I have quite a few that contain learning materials from some of the courses I attended over the years.
There’s a mass of great stuff on these tapes, so awhile ago I started to digitize them. The process is relatively easy and if you still have a cassette player it can be done for free. I no longer had a player so I bought an inexpensive USB Cassette Player. I’ll run through both processes to show how easy it is.
Convert Cassette Tapes to CDs with your own player
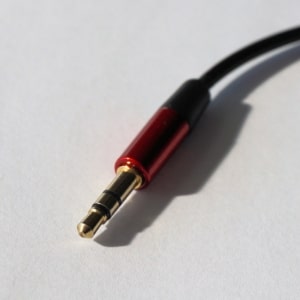
Earphone Jack
You’ll need a cable to connect your tape player to your computer; it needs an earphone jack at both ends: plug one end into the headphone socket on your player and the other into mic socket on your computer.
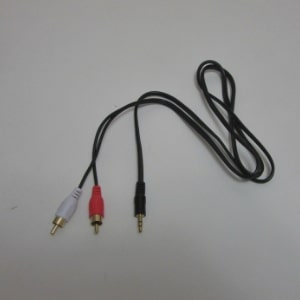
RCA to Earphone Jack Lead
Alternatively if you have RCA (phono) sockets on you cassette player, you can use an RCA to earphone jack lead.
Step 1 – Download the Audio Software
You’ll need to download some free, open source, software called Audacity. You can access it on their website here.
There is a lot that Audacity can do. For in-depth information, there are training manuals on their website here.
Step 2 – Check the Recording level.
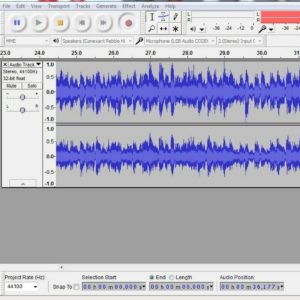
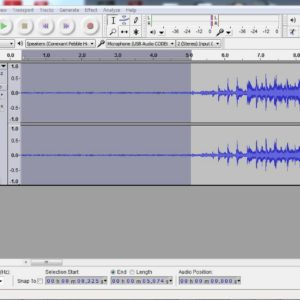
Audacity Screen – setting the levels
I recommend that before you record anything you play the loudest track on the tape and check the sound levels on the Audacity screen. You need the peaks to be within the two bands, ie between 1.0 and -1.0 (see picture above). If you don’t do this, the recording is likely to sound distorted. You can adjust the levels using the slider controls.
Once you are happy with the levels, you can start recording.
Step 3 – Record the first track
It is possible to record the whole of a side of a cassette and then split it into tracks afterwards. However, I find this very fiddly and time consuming and therefore think it is easier to record one track at a time.
So, click on “record” and play the first track. Press stop when finished.
Editing on the Audacity Screen
Once recorded, you can play back and delete any unwanted footage at the beginning and end of the track by highlighting and cutting (using the scissor icon – top right on the picture)
Step 4 – Add Meta data and save recording
Once you have completed recording and editing the first track, create a folder on your computer (wherever you keep your music) and give it the artist’s name. Then create a sub-folder with the name of the album.
In Audacity, click on “File”, then “Export”. Find the sub folder and name the track. The track can be saved as an MP3 file or there are several other options including WAV and AIFF (Apple). I usually save as MP3. Click on “Save”.
Next, Audacity will ask you to add Meta data. As an audio cassette is an analogue recording, it doesn’t contain any Meta data like a CD (artist name, album title etc). It therefore has to be added manually.
Step 5 – Record the rest of the cassette
Repeat steps 3 and 4 until the whole of the cassette is complete.
Step 6 – Go to the media player
If you are using Windows Media Player (or the Apple Mac equivalent), you should find the cassette you’ve just digitized. If you haven’t been consistent with the Meta data for each track, you might see the recording spread over two or three folders. Just use your mouse to move them into one folder.
As long as you are connected to the internet, the media player should have automatically found the album cover. If not, you should be able to find the image on Google and then just copy and paste into your media player.
In the media player you can burn the recording on to a CD. If you want to create a cover for the disc see my post about digitizing vinyl records for more information and a link for downloading a template.
Alternatively you can download the MP3 file to play on other devices.
Convert Cassette Tapes to CDs with a USB tape player
I no longer had a cassette player, so I purchased a USB player which, as the name suggests, connects to a USB input on a computer. I went for the Honest Technology (Honestech) Audio Recorder 3.0 Plus with Cassette Player. This item is currently unavailable on Amazon, but there other similar products such as this one.
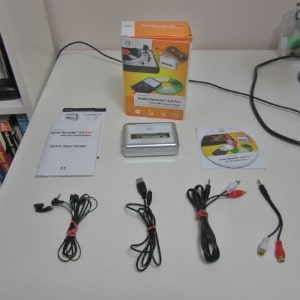
Honestech USB Cassette player and recording software
The Honestech product is basically a personal cassette player like the original Sony Walkman, the only difference being that it has a mini USB socket so that you can connect it to your computer using a USB cable. Included with the player are:
- USB Cable
- Earphone Jack to 2RCA (female) cable
- Earphone Jack to 2RCA (male) cable
- Earphones
- Audio Recorder 3.0 Software CD
- User Guide
The player comes with software called Audio Recorder 3.0. This works like Audacity mentioned above. When I bought the product, I installed the software and used it for a while. However, I prefer to use Audacity, it has more options and I find it easier to use. I therefore recommend using Audacity and following the steps above.

Recording Device setting on Audacity set to USB Audio
Before you start recording, make sure the Device on Audacity is set to USB Audio. Go to Edit, then Preferences, then set the Recording device to “Microphone Array (2-USB Audio (see image above).
Whether you use Audacity or Audio Recorder, this product works well and I’ve been relatively pleased with the results. You should be aware though that audio cassettes deteriorate over time and the sound quality will not be as good as CDs or probably even vinyl records. However, as long as your cassettes are in reasonable shape, you should get acceptable results.
USB Cassette to MP3 Converter, Portable Walkman Cassette Audio Music Player Tape-to-MP3 Converter with Earphones

Click here to see it on Amazon
For info about digitizing other things like VHS tapes and photographs, see How to Digitize Old Media.
Happy digitizing!
Please pin a pin to Pinterest:


What audio record editor can I use for this? Is audacity can be? I think it’s interesting it’s my first time to convert cassette tapes to mp3s and cds. I try to find this option. https://audacityguides.com/
Yes, I used Audacity
Looks interesting
yes , i’m interested in cassette to cd and also in your genealogy thank you
You’re welcome Phyllis!
Excelente lo que se puede hacer hoy día con la vieja tecnología. Yo tengo muchos cassettes de audio y deseo rescatar. Muchas gracias por compartir tus experiencias.
You’re welcome Henry
I have a nonprofit where I digitize cassette tapes, 8-tracks, and LP’s g do or folks in recovery from Alcoholism.
All of the cassettes have been donated.
This also includes remastering as well. Everything is downloadable without regard to computer platforms.
Jacob
Thanks Jacob!